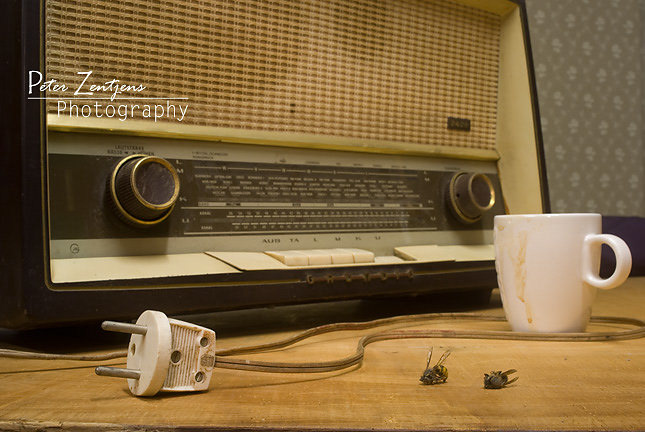
Before, using ambient light
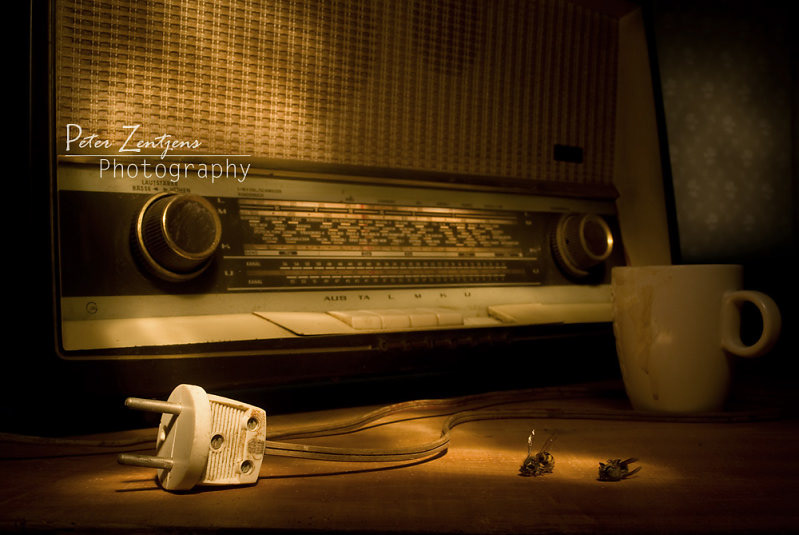
After painting with light
How I started
I can not claim that this is a technique that I invented myself. Far from it for it’s an old example of experimental photography. Let me start with trying to reconstruct the path that led me to where I’m today in the wonderful world of painting with light. Next I’ll describe my own application of this lighting method in still life photography.
First things first. Like many of you I’d never heard of Painting with light until I bumped into the work of Emil Schildt. Emil is an experimental photographer who’s experiments go in many directions. I’d like to try more of the things he has done, but, at the moment I'm fully submerged in painting with light. Although Emil’s subjects are completely different from my own (his are nude models mostly), he was a huge inspiration for me. I can honestly recommend that you have a look at his work.
You will see that it really has a painterly feeling. Naturally, in Emil’s case, this feeling is enhanced by his other techniques, such as his special printing methods and so on. It’s this feeling that I was after in my lighting. What really got me experimenting was Emil’s description of his used techniques. Here is his painting with light tutorial.
Based on this tutorial I started to experiment. In those days I was still shooting analogue and I quickly gave up. The reason was simple. I had little spare time for my hobbies and practicing a new technique on film, having do develop them and mostly just see that it didn’t work out, having to start over again… Let’s just say it was discouraging and I wished I had a Polaroid camera.
There was something better then Polaroid though: digital. When I bought my first digital camera I pick up my experiments again. The camera wasn't really suited for it: long exposures resulted in more noise and enough dead pixels to fill up the sky with stars. Yet those problems where nothing Photoshop couldn't handle and now I could experiment freely, see the results instantly and adjust my technique according to what I saw.
I don’t know if it’s because the subjects are different, or because I’m jut not Emil, but I started to disagree on a number of things in his tutorial. I started to develop my own technique or, if you prefer, my own work flow. So let me explain how I apply this creative technique in my still life photography.
My work flow
Where Emil advices to use a light bubble with a reflector, I advice to go for a flash light. It suited my purpose better. Of course I’m working on a totally different scale, so if you are a model photographer I think you will have to stick to Emil’s advice. But if your subjects are smaller, like my still life, well, I prefer a shielded light source which produces a beam that is easier to aim an to concentrate on one part of the image.
Just to be complete, we are talking long exposures here, so you will need a tripod.
My first active step is simple yet takes up most of my time. It’s something you'll have to do for all types of studio photography anyhow: setting everything up. I usually start with a quick arrangement of my subjects on a table or whatever I'm using. I’m not carefully composing yet. Just putting the items in more or less the position I want to have them. This will usually change ten times or more, but that’s not that important now. Right now, I'm looking for the angle mostly, for how to set-up the camera on the tripod.
Once the camera is up on the tripod I start to very carefully arrange my items and to really build up the composition. Of course, while doing this, the chance is big that angle and crop are slightly adjusted again. All of this has little to do with the technique we are discussing, so let’s move on.
If this is the first time you are using this technique with this combination of tools (camera and light source) you will have to set up a balance between your camera and what you want to achieve. Now I'm mostly talking about the settings and amongst those most of all about white balance. Of course if you shoot raw, you have the ability to edit the white balance later on and then it’s not so important at this stage. I usually want a very warm mood so I leave my white balance to auto which, with my camera, results in a warm, reddish glow from my flash light.
It’s that combination, light source and white balance, that will dictate the colors and general mood. If you change your light or camera, you will have to search for the right settings again so try to stick to the same equipment as much as possible. When I bought my new camera and specially when I started to shoot in raw I totally lost direction and it took me a while to get the results I wanted again. On the other hand, once you used the same combination for a while, getting the results you want will go a lot smoother as you can know what to expect.
According to the size of the subject, the distance to it and so on, you will have to decide on an aperture and a shutter speed. For the ISO value I would stick to the lowest one your camera has to reduce noise to an absolute minimum. The big advantage of digital is that you can do a few trial runs to see if you set up your aperture and shutter speed correctly. If not, don’t change your aperture! You need that to pick the depth of field you want to achieve. The big difference here is that Emil’s shooting models that have to sit still, so you want the fastest shutter speed possible. But my still life isn't going anywhere, so I adjust the shutter speed and keep the depth of field where I want it.
Now, to make the actual picture, or to do my trial runs, I said the camera on “timer”. I make the room pitch black, which is very important as you don’t want any light source other then your flashlight interfere with your image. Another great use of the flashlight is to find the camera, push the shutter, and wait for the timer.
It’s here that the fun starts. Trust me, you will need a whole bunch of trials before getting it right. Work out a “path” for your light source to follow. Try to get the lightning right in one smooth motion. You can also hesitate with the light source on certain points of your composition to highlight them. You can move slowly or very fast to achieve different effects. Just be creative! Remember one rule of thumb though: keep moving the light or it will burn a spot into your image. If you want to highlight something, for example, make a slow circular motion to get a soft edge. Of course, it’s totally possible that you want that burned in spot, like I said: be creative. Just think of it this way:
Your flash light is your brush, light is your paint.
Repeat this, over and over again, until you get what you want, until you have your path worked out. The strokes of light have to be applied just right and it's best if you have several images where you like the light, be it in general or in one certain area of your composition.
Just remember, you are shooting digital, don’t be afraid of Photoshop or similar programs. Photoshop is your friend, even more accurate, Photoshop is your darkroom. Not all digital cameras give good results on longer, darker exposures like I already mentioned. So it’s possible that you will need a lot of Photoshop work to correct noise and dead pixels but I use it for a little more then just that.
At this point, I have several images which I like and, just to give an example, you will see this happening too, picture 1 has the light just right on item this, picture 2’s background is far better lit and picture 3 has a spot of light on this tiny detail that non of your other pictures have. I think you can guess my next step, right? I'm going to melt those 3 photos into one composite image where I have the light exactly the way I want it, everywhere.
I’ll do this using masks mostly, painting them with my Wacom tablet. Hiding bits from one image, showing bits from another, until everything is just right. It's also possible that I'll do some other small adjustments here like a little dodging, burning, small color corrections etc. Just like I would do in my darkroom in the ol’days. It's, if you are into those, also perfectly possible to apply a texture to your image here. I could go on for ages, but I'll just repeat my rule:
Be creative!
I hope that my explanation and my work will inspire you as Emil's work and tutorial inspired me because if there's one thing that can be said about this technique, then that is that it's lots of fun!
Find my still life work for sale @redbubble